Custom Search

Ubuntu mysql root password

This is a guide on how to set Ubuntu mysql root password. Mysql root password is not the same as Linux root password. They do not share the same account. Mysql has its own root user.

If you didn't choose to install mysql during Ubuntu installation setup, you can install it now. It's just two simple steps. Check my previous post, Ubuntu mysql install guide.

You can use the command below to set mysql root password:

luzar@ubuntu:~$ sudo mysqladmin -u root password new_password

You need to restart the mysql server then:

luzar@ubuntu:~$ sudo /etc/init.d/mysql restart

Ubuntu route add command guide

Ubuntu route add command guide for a new user. The route add command actually is one of route command options used to modify a routing table. The route add option can create a new route, add new network, modify current routing table, and add new gateway.


This is the online help available with route command. You can view this help with route --help command.


Usage: 
route [-nNvee] [-FC] []   List kernel routing tables
route [-v] [-FC] {add|del|flush}... Modify routing table for AF.
route {-h|--help} []   Detailed usage syntax for specified AF.
route {-V|--version}   Display version/author and exit.
-v, --verbose          be verbose
-n, --numeric          don't resolve names
-e, --extend           display other/more information
-F, --fib              display Forwarding Information Base (default)
-C, --cache            display routing cache instead of FIB=Use '
-A ' or '--'; 
default: inet
List of possible address families (which support routing):
inet (DARPA Internet) inet6 (IPv6) ax25 (AMPR AX.25)netrom (AMPR NET/ROM) 
ipx (Novell IPX) ddp (Appletalk DDP)x25 (CCITT X.25)

This is the description:


DESCRIPTION
Route manipulates the kernel's IP routing tables.  Its primary  use  is
to  set up static routes to specific hosts or networks via an interface
after it has been configured with the ifconfig(8) program.
When the add or del  options  are  used,  route  modifies  the  routing
tables. Without these options, route displays the current contents of
the routing tables.

The route command with no option will print the routing table. See an example below:


luzar@ubuntu:~$ route
Kernel IP routing table
Destination  Gateway         Genmask        Flags Metric Ref  Use Iface
localnet     *               255.255.255.0  U     0      0     0  eth0
default      mygateway1.ar7  0.0.0.0        UG    100    0     0  eth0
luzar@ubuntu:~$

Here is an example of Ubuntu route add command to create a new network route:


luzar@ubuntu:~$ sudo route add -net 10.21.35.0 netmask 255.255.255.0 dev eth0 
[sudo] password for luzar:
luzar@ubuntu:~$ route 
Kernel IP routing table
Destination     Gateway         Genmask         Flags Metric Ref  Use Iface
localnet        *               255.255.255.0   U     0      0     0  eth0
10.21.35.0      *               255.255.255.0   U     0      0     0  eth0 
default         mygateway1.ar7  0.0.0.0         UG    100    0     0  eth0
luzar@ubuntu:~$

You can see the new route is added in the routing table above.

Ubuntu mysql install

You can check whether mysql has been installed in Ubuntu system with the ps command or dpkg command to check the installed package.

Check mysql daemon using ps command:


luzar@ubuntu:~$ ps aux | grep mysql
root 4078 0.0 0.1 1772 524 ? S 05:19 0:00 /bin/sh /usr/bin/mysqld_safe
mysql 4120 0.0 3.1 127088 16312 ? Sl 05:19 0:01 /usr/sbin/mysqld
--basedir=/usr --datadir=/var/lib/mysql --user=mysql
--pid-file=/var/run/mysqld/mysqld.pid --skip-external-locking
--port=3306 --socket=/var/run/mysqld/mysqld.sock
root 4122 0.0 0.1 1700 556 ? S 05:19 0:00 logger -p
daemon.err -t mysqld_safe -i -t mysqld
luzar 4775 0.0 0.1 3004 752 pts/0 R+ 07:51 0:00 grep mysql
luzar@ubuntu:~$


Check mysql package using dpkg command:


luzar@ubuntu:~$ dpkg -l | grep mysql
ii libdbd-mysql-perl 4.005-1 A Perl5 database interface to the
MySQL data
ii libmysqlclient15off 5.0.51a-3ubuntu5.1 MySQL database client library
ii mysql-client-5.0 5.0.51a-3ubuntu5.1 MySQL database client binaries
ii mysql-common 5.0.51a-3ubuntu5.1 MySQL database common files
ii mysql-server 5.0.51a-3ubuntu5.1 MySQL database server
(meta package dependin
ii mysql-server-5.0 5.0.51a-3ubuntu5.1 MySQL database server binaries
ii php5-mysql 5.2.4-2ubuntu5.1 MySQL module for php5
luzar@ubuntu:~$


So I already have mysql installed during installation. If you don't have mysql in your Ubuntu server, you can install it using apt-get command. If you already configured your Internet connection, then issue the apt-get command like in the example below:


luzar@ubuntu:~$ apt-get install mysql-server-5.0


The apt-get tool will ask you to confirm the mysql installation, and you need to answer Y (yes).

That's all you need to do to have mysql installed in your Ubuntu system.

Ubuntu Linux ftp command line

This is a guide on how to connect to Ubuntu ftp using command line.


  1. Type ftp and enter to continue.

  2. Type open and enter to continue.

  3. Type ftp server ip address and enter to connect to ftp server.

  4. If connected, type login name and enter.

  5. Type user password and enter. If the username and password are valid, then you'll be in.


Here is the actual example from Ubuntu command line terminal:


luzar@ubuntu:~$ ftp
ftp> open
(to) 192.168.1.3
Connected to 192.168.1.3.220
---------- Welcome to Pure-FTPd [privsep] [TLS] ----------
220-You are user number 1 of 50 allowed.
220-Local time is now 10:42.
Server port: 21.
220-This is a private system - No anonymous login
220-IPv6 connections are also welcome on this server.
220 You will be disconnected after 15 minutes of inactivity.
Name (192.168.1.3:luzar):
331 User luzar OK.
Password required
Password:
230-User luzar has group access to:
luzar admin lpadmin fuse
230- plugdev video dip audio floppy cdrom dialout adm
230 OK. Current directory is /home/luzar
Remote system type is UNIX.Using binary mode to transfer files.
ftp>


Now that you are already in the ftp server, let's check the Ubuntu ftp command that you can use. Type help:


ftp> help
Commands may be abbreviated. Commands are:
! debug mdir qc send$
dir mget sendport siteaccount disconnect
mkdir put sizeappend exit mls
pwd statusascii form mode quit
structbell get modtime quote systembinary
glob mput recv suniquebye hash
newer reget tenexcase help nmap
rstatus tickcd idle nlist rhelp
tracecdup image ntrans rename typechmod
lcd open reset userclose ls
prompt restart umaskcr macdef passive
rmdir verbosedelete mdelete proxy runique ?
ftp>


That's all the ftp commands that you can use.The most important command in ftp is help. The ftp help command is similar to whatis command in Linux. The ftp help command syntax is . Here is an example of ftp help command:


ftp> help get
get receive file


You can also use ? to check ftp command meaning. It is the ftp help command short form. Here is an example of ftp ? command:


ftp> ? put
put send one file
ftp>

You can use ls command to list a directory content in ftp server:


ftp> ls
200 PORT command successful
150 Connecting to port 39545
-rwxrwxrwx 1 luzar luzar 16 Nov 4 06:36 File.txt
drwx------ 3 luzar luzar 4096 Oct 21 11:14 folder
-rw-r--r-- 1 luzar luzar 89 Nov 4 09:48 mysql-init
-rw-r--r-- 1 luzar luzar 16 Nov 4 08:52 new-file.txt
226-Options: -l226 4 matches total
ftp>

The ftp command used to download a single file from a server is get.


The ftp command used to download a multiple files from a server is mget.


The ftp command used to upload a single file to a server is put.


The ftp command used to upload a multiple files to a server is mput.


If you want to exit frm ftp, use ftp bye command.


That's the basic ftp commands you need to know to use ftp in the Ubuntu command line terminal. You can check the rest of ftp commands with help like the example above.


That's all.

Configure ftp server on Ubuntu

After finished the Pure-ftpd installation, you can configure the Pure-ftpd startup file in /etc/default/pureftpd-common. You can change pure-ftpd from a standalone server into the inetd master server if you want. Just change from the default standalone to inetd. In the second part of the configuration file, you can configure ftp server to restricted the contents to one directory or complete file system of your server. If you choose VIRTUALCHROOT=true, then user can only see their home directories.


You can also set some options in a script such as email administrator. Then, provide the path in the UPLOADSCRIPT in the next section of this configuration file. The pure-uploadscript will run this script after a file has been uploaded. You can set a UID and GID to switch user id and group id when running this script.


Use vim editor to configure the pureftpd-common file.


luzar@ubuntu:~$ sudo vim pure-ftpd-common
[sudo] password for luzar:

Here is the default /etc/default/pureftpd-common file opened with vim editor:


# Configuration for pure-ftpd
# (this file is sourced by /bin/sh, edit accordingly)
# STANDALONE_OR_INETD
# valid values are "standalone" and "inetd".
# Any change here overrides the setting in debconf.
STANDALONE_OR_INETD=standalone
# VIRTUALCHROOT:
# whether to use binary with virtualchroot support
# valid values are "true" or "false"
# Any change here overrides the setting in debconf.
VIRTUALCHROOT=false
# UPLOADSCRIPT: if this is set and the daemon is run in standalone mode,
# pure-uploadscript will also be run to spawn the program given below
# for handling uploads. see /usr/share/doc/pure-ftpd/README.gz or
# pure-uploadscript(8)
# example: UPLOADSCRIPT=/usr/local/sbin/uploadhandler.pl
UPLOADSCRIPT=
# if set, pure-uploadscript will spawn $UPLOADSCRIPT running as the
# given uid and gid
UPLOADUID=
UPLOADGID=

The next step is you need to configure other ftp server requirement such as the authentication, log directory, allow anonymous, etc. Pure-ftpd has put all configuration into different files in the /etc/pure-ftpd/conf directory. So change into /etc/pure-ftpd/conf directory with cd command:


luzar@ubuntu:/etc/default$ cd /etc/pure-ftpd/conf
luzar@ubuntu:/etc/pure-ftpd/conf$ ls -l
total 24-rw-r--r-- 1 root root 36 2008-01-24 09:30
AltLog-rw-r--r-- 1 root root 5 2008-01-24 09:30
MinUID-rw-r--r-- 1 root root 4 2008-01-24 09:30
NoAnonymous-rw-r--r-- 1 root root 4 2008-01-24 09:30
PAMAuthentication-rw-r--r-- 1 root root 28 2008-01-24 09:30
PureDB-rw-r--r-- 1 root root 3 2008-01-24 09:30
UnixAuthenticationluzar@ubuntu:/etc/pure-ftpd/conf$

Use your favorite text editor to edit the files. Here are the description and the default configuration value of the files above:


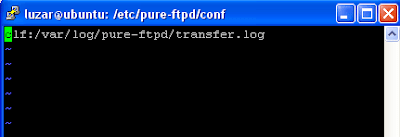
AltLog - path to the pure-ftpd logs directory.


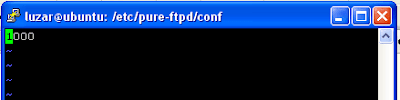
MinUID - Indicates the minimal user ID used by pure-ftpd.


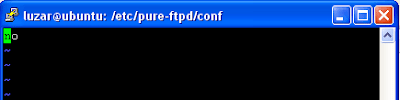
NoAnonymous - Specifies if anonymous users are accepted.



PAMAuthentication - Indicate if PAM authentication is used.


PureDB - An alternative to PAM-based authentication.
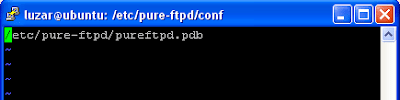


UnixAuthentication - Authentication based on /etc/passwd and /etc/shadow.


After finished these configurations, your ftp server is ready for action. Restart your ftp server for the configuration to take effect.


luzar@ubuntu:~$ sudo /etc/init.d/pure-ftpd restart
[sudo] password for luzar:
Restarting ftp server:
Running: /usr/sbin/pure-ftpd -l pam -E -u 1000 -O clf:
/var/log/pure-ftpd/transfer.log -B
luzar@ubuntu:~$